Displaying textures in the Well View
By displaying textures in the Well View, you can visualize more detailed information about lithology and facies than only color can do. Apart from the default textures already available, you can also add your own textures to the Texture Catalog.
![]() Displaying textures using the Discrete Property Class Editor
Displaying textures using the Discrete Property Class Editor
The settings on the Discrete Property Class Editor, opened from the context menu of a discrete log in the JewelExplorer, define the display of the discrete property classes in the Well View. Before you start working in the Well View, make sure these settings are as you want them. You can select to use a color only, or color and texture. If you assign a color and a non transparent texture to a discrete property class, only the texture is displayed in the Well View.
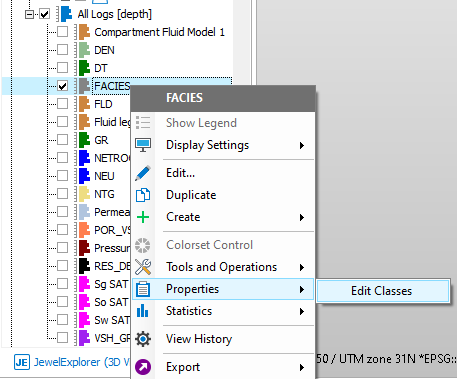
To open the Discrete Property Class Editor, RMB on a discrete log, go to Properties and select Edit Classes. click to enlarge
To assign a texture to a class and display it in the Well View.
- Open the Discrete Property Class Editor for the log type that has the classes you want to assign a texture to, using the context menu (RMB on the log in the JewelExplorer > Properties > Edit Classes).
- Per class, left mouse click in the entry field in the Texture column to select it. Click one more time to activate the drop-down list. The list contains all the textures that are available on the Texture Catalog. You can add textures to the list yourself, see Texture Catalog.
- Select the texture of your choice.
- Click Apply to save the changes and keep the form open, or click OK to save the changes and close the form.
-
Every Well View that you open from now on, will use these display settings for the classes of the selected log.
If the Apply button is not activated, click in the white space underneath the table on the form.
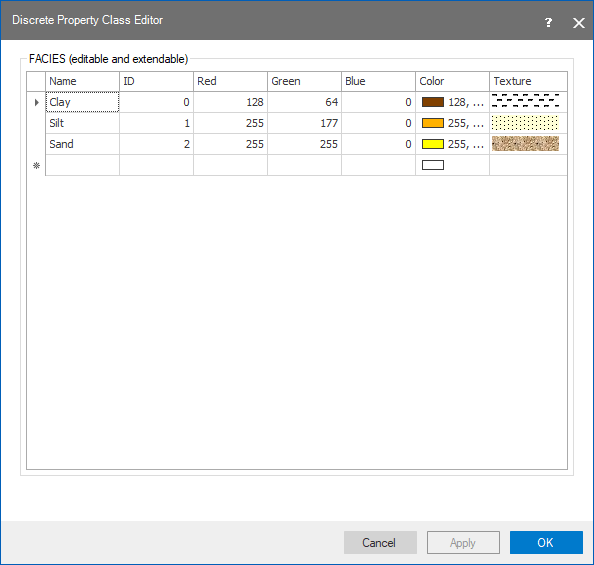
An example of the Discrete Property Class Editor with assigned textures. When the FACIES log is selected for display in the Well View, these colors and textures are used. When the selected textures are not transparent, only the textures are visible in the Well View. click to enlarge
You can use the Template Editor to assign and display textures:
- For discrete property classes
- For a discrete property track
- For continuous logs
- For a summation track
For discrete property classes, by default the settings on the Discrete Property Class Editor determine the display of the classes in the Well View. You can, however, manually override these settings per Well View with the Template Editor. To do so:
- From the Well View, open the Template Editor. You can open the Template Editor via the icon (
 ) in the Well View toolbar, right-clicking anywhere in the Well View and selecting Edit Template... from the context menu or by double-clicking on a blank part of the Well View canvas.
 - Select the discrete log in the Track Explorer. This opens the settings pane for the selected log.
- In the table under Curve Filling Settings in the settings pane, select the class for which you want to change the texture (the row is highlighted in blue).
- Left mouse button click in the Texture column to activate the drop-down list with all available textures in the Texture Catalog.
- Select a texture.
- Click Apply to save the change and keep the Template Editor open, or click OK to save the change and close the form.
- The Well View is updated immediately. If you save the current settings to a template, you can apply the texture in other Well Views as well. If you don't save the settings in a template, the settings are only applied to the currently selected Well View (indicated in the title bar of the Template Editor form).
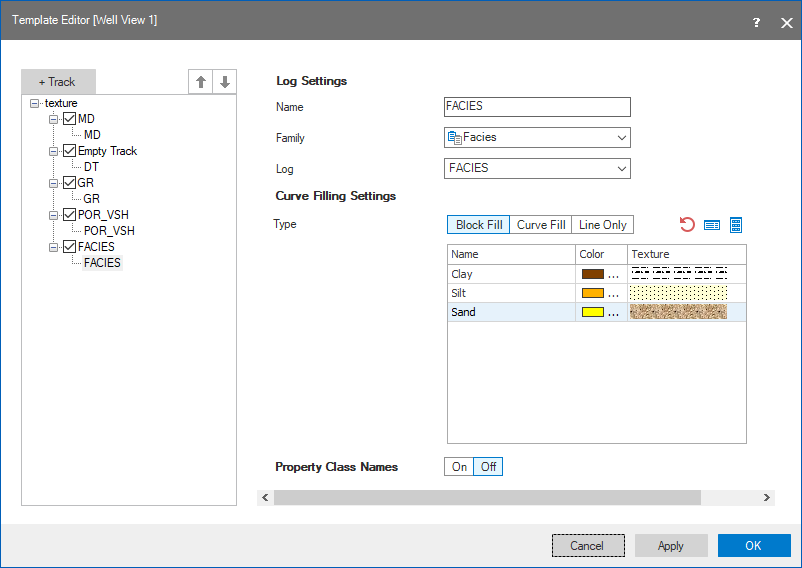
An example of the Template Editor with assigned textures. When the FACIES log is selected, these textures are used for display in the active Well View (indicated in the title bar of the form). click to enlarge
The table has a toolbar with the following options:

|
Reset to the settings as specified in the Discrete Property Class Editor. |
|
|
Open the Discrete Property Class Editor. After making changes on the Discrete Property Class Editor form, click the Reset icon to update the table. Click Apply on the Template Editor form to update the Well View. |
|
|
Open the Texture Catalog. After adding or deleting a texture on the Texture Catalog form, the drop-down list in the table is updated immediately. |
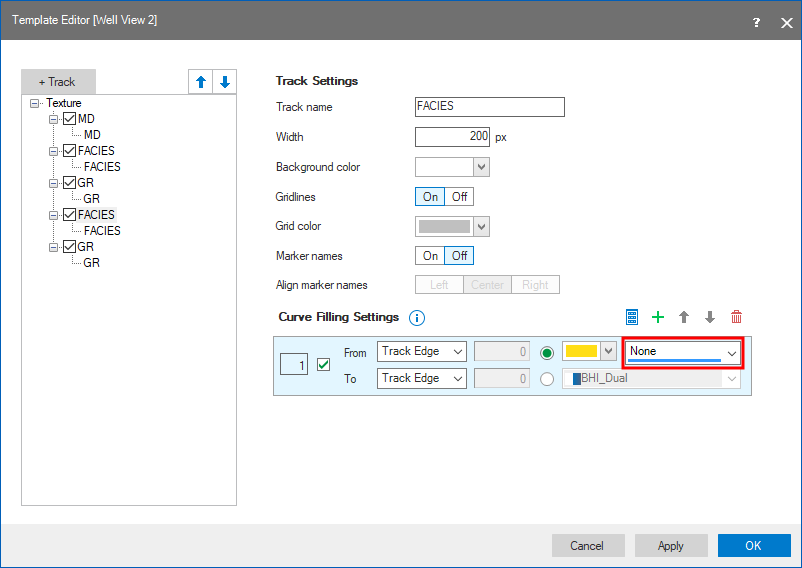
For a discrete property track, you can change the display in the settings pane. To do so:
- From the Well View, open the Template Editor. You can open the Template Editor via the icon () in the Well View toolbar, right-clicking anywhere in the Well View and selecting Edit Template... from the context menu or by double-clicking on a blank part of the Well View canvas.
- Select the discrete log track in the Track Explorer. This opens the settings pane for the selected track.
- In the Curve Filling Settings toolbar click the green plus icon (
 ) to add a fill setting to the track.
 - Define the fill behavior with the drop-down list options for From and To. For a discrete log track, you can only select Track Edge.
- Go to the texture drop-down list and select the texture of your choice.
- Click Apply to save the changes and keep the Template Editor open, or click OK to save the changes and close the form.
- The Well View is updated immediately. If you save the current settings to a template, you can apply the texture in other Well Views as well. If you don't save the settings in a template, the settings are only applied to the currently selected Well View (indicated in the title bar of the form).
Select the texture of your choice from the texture drop down list. click to enlarge
For continuous logs, you can assign a texture to the track. To do so:
- From the Well View, open the Template Editor. You can open the Template Editor via the icon () in the Well View toolbar, right-clicking anywhere in the Well View and selecting Edit Template... from the context menu or by double-clicking on a blank part of the Well View canvas.
- Select the continuous log track in the Track Explorer. This opens the settings pane for the selected track.
- In the Curve Filling Settings toolbar click the green plus icon () to add a fill setting to the track.
- Define the fill behavior with the drop-down list options for From and To. There are a few combinations you can define between the available fill types: Track Edge, Property, Value and Mean.
- Go to the texture drop-down list and select the texture of your choice.
- Click Apply to save the changes and keep the Template Editor open, or click OK to save the changes and close the form.
- The Well View is updated immediately. If you save the current settings to a template, you can apply the texture in other Well Views as well. If you don't save the settings in a template, the settings are only applied to the currently selected Well View (indicated in the title bar of the form).
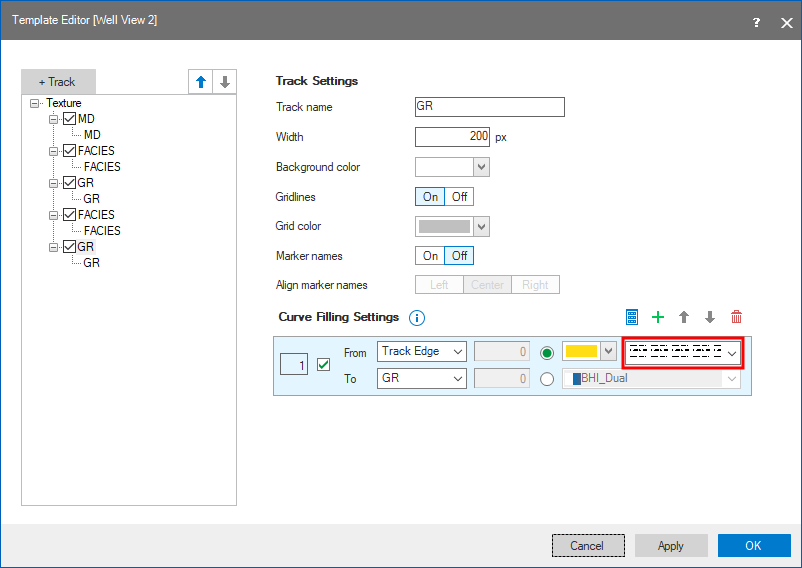
Select the texture of your choice from the texture drop down list. click to enlarge
For a summation track you can add textures for the track and the selected logs.
For the track itself, you can change the display in the settings pane. To do so, repeat the steps listed above, but instead of selecting a continuous log track, select the summation track.
To add a texture to the selected logs:
- From the Well View, open the Template Editor. You can open the Template Editor via the icon () in the Well View toolbar, right-clicking anywhere in the Well View and selecting Edit Template... from the context menu or by double-clicking on a blank part of the Well View canvas.
- Select the summation log in the Track Explorer.
- In the Displayed logs table, select a texture from the texture drop-down list for any log that you want to display with a texture.
- Click Apply to save the changes and keep the Template Editor open, or click OK to save the changes and close the form.
- The Well View is updated immediately. If you save the current settings to a template, you can apply the texture in other Well Views as well. If you don't save the settings in a template, the settings are only applied to the currently selected Well View (indicated in the title bar of the form).
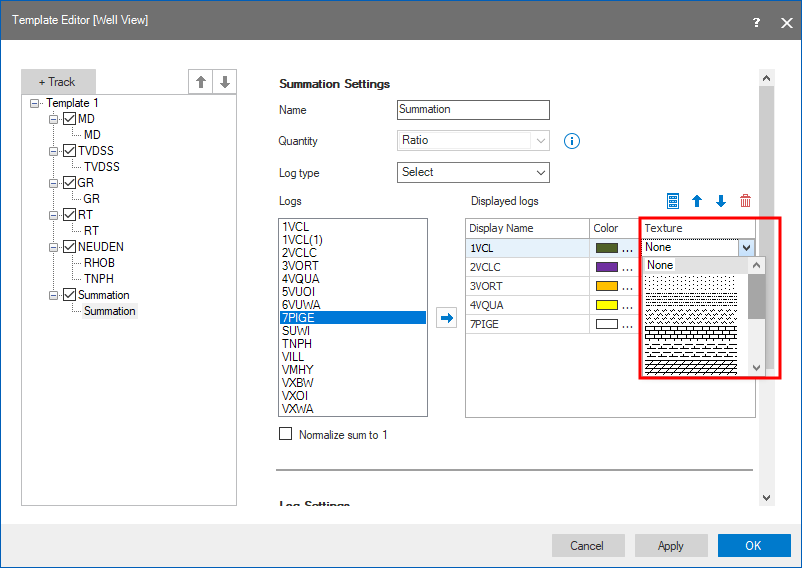
Select the texture of your choice from the texture drop down list. click to enlarge